Understanding Exposure
09 Jun 2024
Understanding Exposure in Landscape Photography
Switching from automatic modes to manual can be a daunting prospect for amateur photographers keen to push their creative skills forwards. Often attempts to take more control can result in photos turning out too dark or too bright. Understanding exposure is the key to transforming opportunities into stunning photographs.
Mastering exposure is crucial for any photographer, but it’s particularly essential in landscape photography where lighting conditions are not within our control and can change quickly and dramatically. Let me guide you through the basics of exposure and provide you with the knowledge to confidently take control of your camera settings.
Download this guide as a printable PDF.
What is Exposure?
Exposure in photography simply refers to the amount of light that reaches your camera’s sensor or film. It determines how light or dark an image will appear. Proper exposure ensures that your photo accurately represents the scene you’re trying to capture, with the right amount of detail in both the highlights and shadows.
Exposure is controlled by three main components: aperture, shutter speed, and ISO. These elements form what is known as the exposure triangle. Understanding how each of these components affects exposure will allow you to make informed decisions when adjusting your camera settings.
APERTURE
You can think of aperture as the pupil of your camera lens. Just as the pupil in your eye dilates or contracts to control the amount of light entering your eye, the aperture adjusts to control the light entering the camera.
A wider aperture (lower f-stop number) lets in more light, which is useful in low-light conditions but reduces depth of field, making only a small part of the image sharp. A narrower aperture (higher f-stop number) lets in less light but increases depth of field, which is often desirable in landscape photography to keep everything in focus from foreground to background.
Key characteristics: Controls depth of field and has a significant impact on the parts of your image which are in sharp focus.

SHUTTER SPEED
Shutter speed is how long the camera's sensor is exposed to light. A fast shutter speed (e.g., 1/1000s) can freeze motion, making it ideal for capturing sharp images of moving subjects, like wildlife or sport. A slow shutter speed (e.g., 30s) allows more light in and can create a sense of motion blur, which can be used artistically to show the movement of water or clouds.
Key characteristics: Fast shutter speed for crisp details and moving subjects. Slow shutter speed to allow blurring of moving elements like water or clouds.
ISO
ISO controls the sensor’s sensitivity to light. In bright conditions, you can use a low ISO to maintain image quality and reduce noise. In darker conditions, increasing the ISO can help achieve a proper exposure, but it comes at the cost of potentially introducing grain or noise into the image. The full stop ISO units are shown in black below for simplicity.

Key characteristics: The higher the ISO the more potential for noise (grain) in the image.
The Exposure Triangle
The exposure triangle is a concept that illustrates the direct relationship between aperture, shutter speed, and ISO. These three settings work together to control the exposure of a photograph. Changing one setting will impact the others, and achieving a balanced exposure involves finding the right combination of all three.

Download my exposure triangle as a printable PDF.
As ISO increases from e.g., 100 to 200, 400, 800, 1600, the sensitivity of the sensor DOUBLES each time i.e., it simply becomes twice as sensitive to light.
As the aperture is opened up e.g., from f/11 to f/8 or from f/8 to f5.6, the amount of light passing through the lens DOUBLES each time.
As the shutter speed is changed from e.g., 1/500s to 1/250s to 1/125s, the amount of light DOUBLES each time.
You can think of doubling or halving values to brighten or darken your images.
These increments are referred to as “stops”.
When photographers talk about "stops" they're referring to adjustments in any of these three settings to control exposure. A change of one stop, regardless of whether it's in ISO, aperture, or shutter speed, means a doubling or halving of the amount of light that affects the image.
In summary, while "f-stop" specifically refers to aperture settings, "stops" in general photography terms encompass changes in ISO, shutter speed, and aperture to manage exposure levels.
Modern DSLR cameras have third stop increments, which is great for control, but does make familiarising yourself with the numbers more daunting. The full stop units are shown in black below for simplicity.

BALANCING THE EXPOSURE TRIANGLE
If we assume we are starting with a correct exposure, then INCREASING any of the values will result in over exposure, where the resulting image is too bright. This would make an adjustment in one or both of the other components necessary.
Increase ISO = Reduce shutter speed and/or aperture
Increase Shutter Speed = Reduce ISO and/or aperture
Increase Aperture = Reduce ISO and/or shutter speed
Conversely if you reduce any values you would need to increase one or both of the other two components to keep the exposure triangle balanced.
Aperture and shutter speed priority modes when used in conjunction with auto ISO will adjust the other two parts of the triangle. With aperture priority (AV Canon; A Nikon) the shutter speed and ISO will be automatically adjusted to keep your desired aperture. With shutter speed priority (TV Canon; S Nikon) the aperture and ISO will be automatically adjusted to keep your desired shutter speed.
Key considerations for successful exposure
The amount of light and your subject will be the main considerations for the combination of ISO, aperture and shutter speed to aim for. Your settings will be vastly different shooting seascapes in winter than shooting wildlife images on safari.
ISO CONSIDERATIONS:
The lower the ISO the cleaner the image.
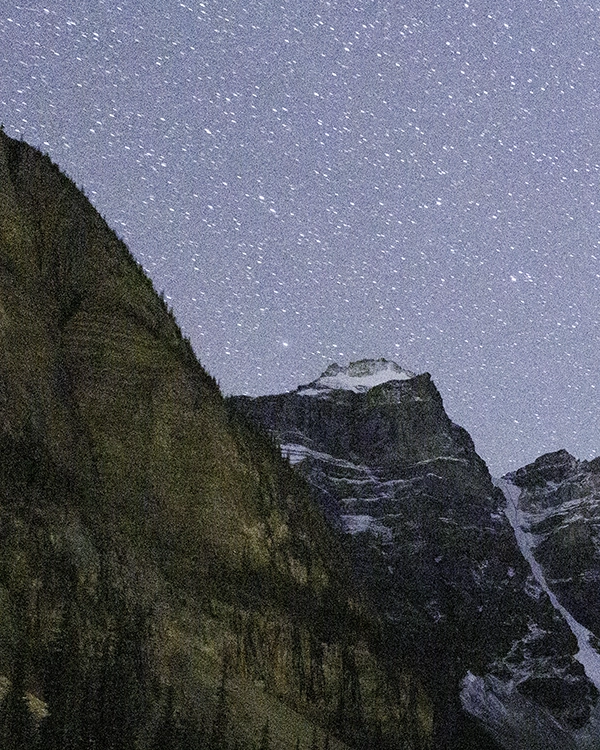
See the example image below of a noisy image shot at ISO3200. Noise can be cleaned up in post-processing (sometimes very well), but best practice is to use as low of an ISO as possible. Also note in the sample image that the stars have begun to "trail", most noticeably at the top, and a shorter shutter speed is required to eliminate this.
Use higher ISO with moving subjects in order to “freeze” the action. Higher ISO’s help achieve faster shutter speeds for sports, wildlife etc.
If you’re not using a tripod, increasing ISO is useful to achieve a faster shutter speed to reduce camera-shake. Experiment to establish what shutter speed you are able to hand-hold without camera-shake. Longer lenses exaggerate camera-shake but image stabilisation features in camera significantly help to keep the images crisp, (as long as your subjects are static).
If you are shooting a static landscape then most frequently you will use the lowest ISO to keep noise to a minimum, especially if you are using a tripod when camera shake is not usually a consideration.
APERTURE CONSIDERATIONS:
Use narrow apertures for a greater depth of field, ensuring both foreground and background elements are in focus. For landscape photography, where front-to-back sharpness is often desired, apertures like f/9 and f/11 are particularly useful.
However, extremely narrow apertures, such as f/22, can cause diffraction, leading to softer images. Despite this, they can still be creatively used to produce a starburst effect with bright light sources. This can be a great technique in woodland where you can position the sun partially behind a bough, for example, or just as the sun breaks the horizon at sunrise or sunset.
Sensor spots (particles of dust on the camera sensor) become more noticeable when using apertures between f/11 and f/22, as the rays of light entering the camera are at a more linear angle and cast stronger shadows on the dust particles. Avoiding these apertures when possible will save considerable time in post-processing, especially in scenes with plain areas of sky or snow, for example.
In contrast, use wider apertures to achieve a shallower depth of field. For astrophotography, use wide apertures like f/2.8 to allow more light onto the sensor quickly, preventing star trails. Wide apertures are also effective for creating a sense of depth by rendering backgrounds with a pleasing soft focus due to the limited depth of field.
SHUTTER SPEED CONSIDERATIONS:
Choice of shutter speed is probably the most important in terms of the success or failure of an image. Shutter speed choice can be divided into two decisions, broadly speaking. Technical and creative. Your subject will in the most part dictate your approach to what shutter speed range to be aiming for.
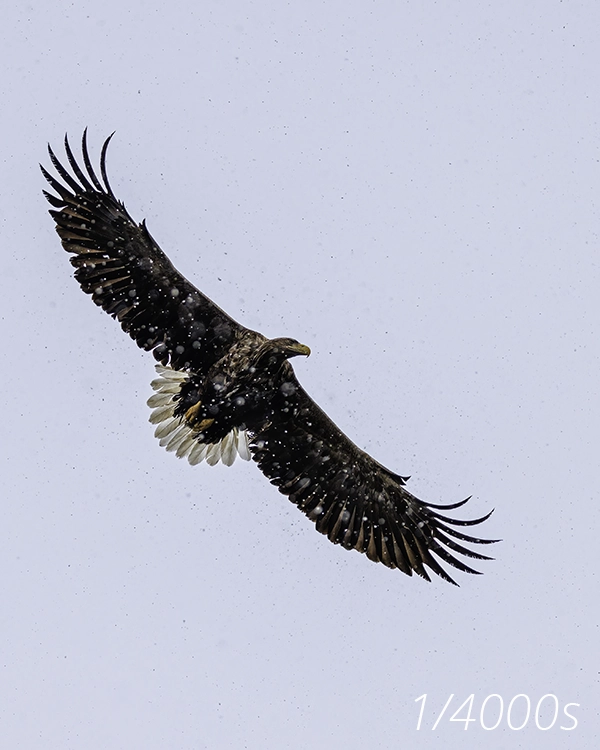
Technical limitations: Moving subjects (and also hand holding the camera) will dictate that you use a fast shutter speed. Most obviously, fast moving subjects such as animals or birds in flight, will require extremely fast shutter speeds (e.g. 1/1000s - 1/4000s). To a lesser degree in a landscape scene you may wish to keep foreground elements still, for example, if the wind is blowing branches, grass or flowers which detract from the image (e.g. 1/60s - 1/250s). Conversely, if you are photographing in low light, you will require a longer (slower) shutter speed in order to get a correct exposure.
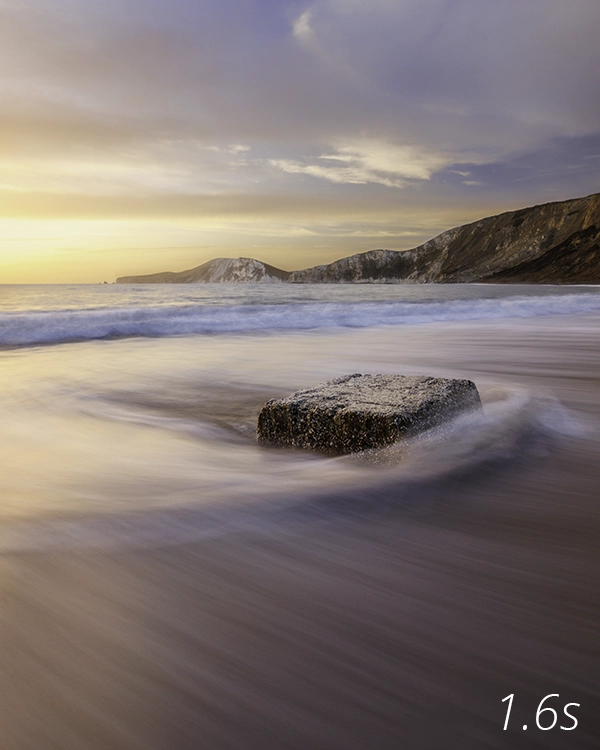
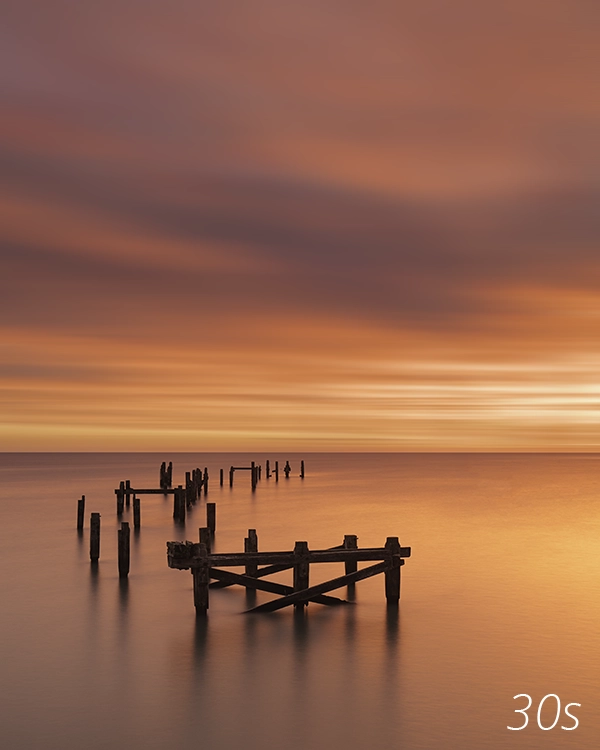
Creative: If you are not constrained to shutter speeds which you are able to achieve handheld you can start exploring the visual effects of slower shutter speeds which can be used to convey movement, such as receding waves at shorelines, showing movement in clouds, for example. In low light, such as either end of the day, slower shutter speeds are easy to achieve, but in brighter light you will discover that even with a low ISO and narrow aperture that your shutter speeds will be too fast to convey movement without the use of neutral density filters.
0.3s - 2 or 3 seconds: Receding waves (depending on the tide and wind)
30 seconds or longer to flatten sea for a minimalistic look or to allow clouds to blur (usually ND filter required)
See in the examples below the visual effect of some shutter speeds.
- 1/4000s to prevent the eagle from blurring
- 1.6s to capture the receeding wave
- 30s to completley flatten the sea.
ND FILTERS
Neutral Density (ND) filters are photographic filters that reduce the amount of light entering the camera lens without affecting the colour of the image. They are essentially "sunglasses" for your camera, allowing you to use wider apertures or slower shutter speeds than you would otherwise be able to in bright lighting conditions. Here are their main benefits:
Longer exposure times. ND filters enable longer exposures, which can create motion blur in moving elements like water, clouds, traffic. This often helps achieve a smooth or ethereal appearance.
Wider apertures in bright light. Useful if you need to use a wide aperture in bright light to achieve background blur, without overexposing the image.
ND filters come in various strengths, typically denoted by their optical density or the factor by which they reduce light.
This list shows some of the ND filters available.
ND2 (0.3): Reduces light by 1 stop (50% of the light passes through).
ND4 (0.6): Reduces light by 2 stops (25% of the light passes through).
ND8 (0.9): Reduces light by 3 stops (12.5% of the light passes through).
ND64 (1.8): Reduces light by 6 stops (1.563% of the light passes through).
ND1000 (3.0): Reduces light by 10 stops (0.1% of the light passes through).
Typically you wouldn’t expect to find or use an ND2 or ND4 which only reduce the light by 1 or two stops, because you would adjust aperture or ISO for a small adjustment, but including them in the list helps visualise the concept and the maths of their effect.
I use the Kase magnetic filter system which is really simple to use and superb quality. For further information read my blog post about the Kase filter system.
I have demo kits available for use on my workshops and 1-2-1's.
How do I know when my image is correctly exposed?
HISTOGRAM
A histogram is a graphical representation of the tonal values in an image. It plots the number of pixels for each tonal value, ranging from black (on the left) to white (on the right). The height of each bar shows the number of pixels at that particular tone. This helps you assess the exposure and contrast of your images, allowing you to see if details are lost in the shadows or highlights and make adjustments accordingly. Ideally there should be a bit of room at either end. You should avoid bunching the peak of the histogram at one end of the scale. It should be in the middle or slightly to the right, as long as it’s not clipping. See dynamic range for further info.
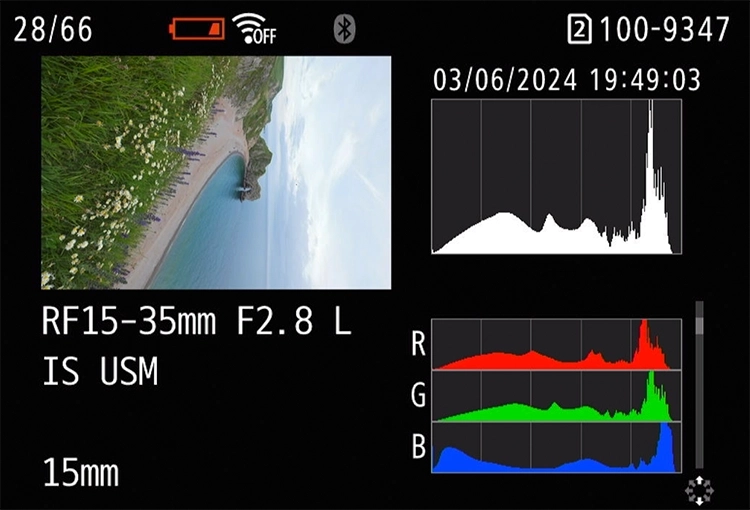
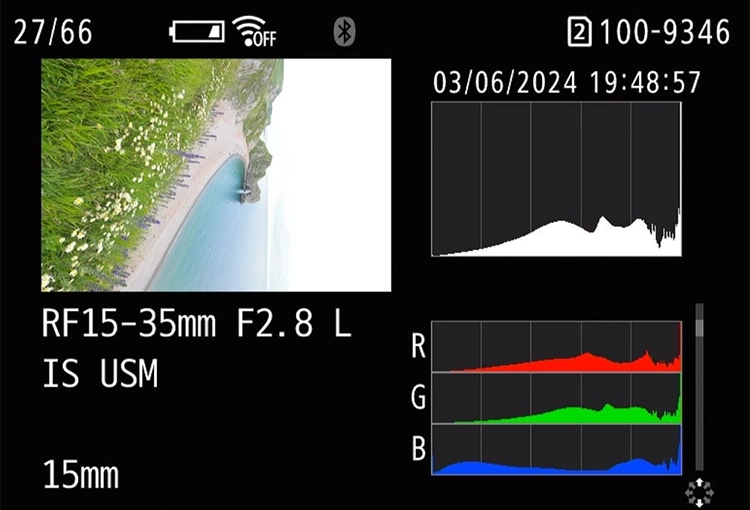
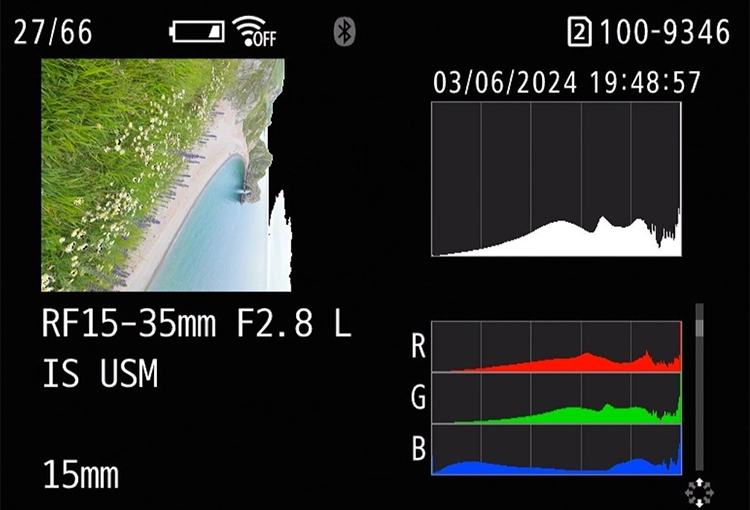
In the images below, you can that in image 28/66 none of the histogram is missing. The entire dynamic range fits within the boundaries of the histogram. In image 27/66 it is clear that the right hand end of the histogram is "clipped", resulting in overexposure. The final screenshot shows the clipped part of the highlights as an overlay on the image (which flashes on and off on the camera). This is known as a highlight, or clipping warning. If your camera has this option it can be a useful one to enable. Depending on the scene and your camera, you will find that some clipping is recoverable in processing. With practice you will get a feel for what will and won't be recoverable.
With newer mirrorless cameras you’ll have access to the histogram before you even press the shutter.
EXPOSURE SCALE
Cameras also have an exposure scale, commonly at the bottom or side of the viewfinder or screen. It will show a scale with a - on one side, a centre line, often denoted with a zero, and a + indicating under or overexposure.
It is important to understand how the camera reads “correctly exposed” on this scale in order to know when it is likely to be accurate. Zero on the meter, half way between the plus and minus ( - 0 + ) equates to 18% grey, a mid-tone grey. This makes sense if you’re photographing mid-tones, but that isn’t often the case. In default auto modes your camera “wants” you to be centred at zero on the meter. Most cameras have several metering modes (such as matrix (evaluative), spot or centre-weighted) which measure the light in the frame in different ways for different scenarios to improve the reliability of the automatic modes. If you are shooting in modes other than manual, you can add exposure compensation, which add a positive or negative bias to over or under expose all of your images from the zero point, which is essential in many cases when your subject is not a mid-grey (snow, dark moody skies etc).
In the screenshot below, you can see the scale indicates a correct exposure with the centre mark being centred. In fact the camera was facing a painted white wall and the "correct" exposure has indeed made the preview (shown behind the scale and settings), grey.

Regardless of your metering mode the easiest way to check whether your exposure is correct is to check your histogram.
DYNAMIC RANGE
Dynamic range refers to the range of light intensities a camera sensor is able to capture, from the darkest shadows to the brightest highlights. It is essentially the amount of tonality that you are able to record within the bounds of the histogram, i.e. without part of the tonal range being forced to “clip” or fall off one end of the histogram.
Often scenes in nature have considerably darker shadows and brighter highlights than can be recorded in a single exposure. There are a couple of options available to help extend the dynamic range of your camera sensor so that you are able to retain shadow details without losing highlight details. In some circumstances graduated neutral density filters are an easy fix but sometimes bracketing your exposures is more suitable.
HDR/BRACKETING
Exposure bracketing is a technique where multiple shots of the same scene are captured at different shutter speeds. The goal of this is to extend the dynamic range and ensure you retain shadow and highlight detail. Exposure bracketing is particularly useful in situations with high contrast, such as landscapes with a bright sky and dark foreground or indoor scenes with bright windows.
Here’s how exposure bracketing typically works:
Standard Exposure: The camera takes a shot at the exposure level recommended by its metering system.
Underexposed Shot(s): The camera takes one or more shots at exposure levels below the standard exposure (darker).
Overexposed Shot(s): The camera takes one or more shots at exposure levels above the standard exposure (brighter).
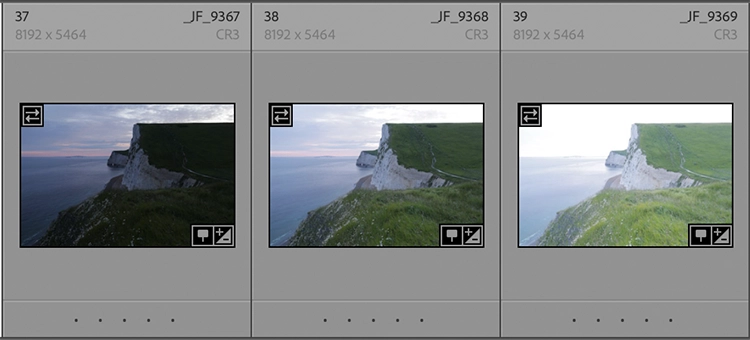
A common bracketing sequence might include three shots: one at the standard exposure, one at -2 stops, and one at +2 stops.
In the example below you can see that the foreground is too dark in the underexposed image on the left but the sky is much better. The sky is slightly overexposed in the normal exposure in the middle and the foreground is still slightly underexposed. The overexposed frame on the right is fairly well exposed for the foreground. With these images combined as an HDR image, it would be possible to balance the sky and foreground elements quickly and simply. You could probably lift the dark areas with some success on the underexposed image, but this would compromise image quality.
The sequence of images would need to be “blended” or combined in editing software such as Adobe Lightroom. The resulting combined file would have the combined dynamic range of all three images.
This technique is very popular as it does not require any special equipment, although it is more successful with a tripod, so the resulting image align more easily when they are combined.
GRADUATED ND FILTERS
Graduated ND filters (known as grads) transition from dark on one end to clear on the other end. They are designed to balance the exposure in scenes with a high dynamic range, where the sky is much brighter than the foreground. They are usually rectangular and attached to the camera with a holder. They are available in different densities (on the dark portion) and with different gradients of transitions (hard, medium, soft & reverse).
Hard-edged graduated ND’s have a sharp, abrupt transition between the dark and clear areas. They are effective with seascapes and other scenes with a clear horizon.
Medium-edged graduated ND’s have a softer transition between the dark and clear areas. They can often be slightly more subtle than a hard edged grad and often easier to position correctly. They are also good for slightly more undulating horizons.
Soft-edged graduated ND’s have a much softer transition which can be positioned easily to just take the edge of a bright sky. Suitable for mountain scenes and more complex horizons.
Reverse graduated ND’s are incredibly useful for sunrise and sunset coastal scenes where the light at the horizon is brightest. They are darkest in the middle and gradually clear toward the top, with the bottom half being clear.
The objective is to darken the sky and “balance” the bright and dark part of the image so that the dynamic range can be captured in one exposure therefor it is necessary to position the grad carefully so that the darker part of the image doesn’t get darkened further. Choosing the right density filter and correct transition is key to making positioning the filter easy.
WHEN TO BRACKET AND WHEN TO USE GRADS
This is largely a personal choice, I know many professional landscape photographers who don’t use grads at all and as well as plenty that do. Personally I think grads have a few significant benefits, but here are some considerations, so you can decide for yourself.
ADVANTAGES OF GRADS
When shooting seascapes, the shutter speed plays a far more significant role in the success or failure of an image, in particular when surf is being used to create leading lines as part of your composition. When bracketing these types of image, two out of three bracketed images will be the “wrong” shutter speed and the three different images when blended can result in artefacts. Thats not to say that this can’t be fixed in processing, but using grads to balance the scene gives you three times the chances of success, a lot less editing.
Predictable results: You get immediate feedback on the effect of the filter on the image and are able to make on the spot adjustments to your exposure settings without relying on post-processing.
Efficient: You save time in post-processing.
DISADVANTAGES OF GRADS
Cost and convenience. Requires carrying physical filters, which can be expensive and cumbersome. High-quality graduated ND filters can be costly.
Fixed transitions and densities. Limited to 1,2 & 3 stops as graduated filters, commonly.
ADVANTAGES OF BRACKETING
Flexibility and dynamic range greater. Complex scenes with extreme dynamic range can be recorded and blended with relative ease.
No equipment required. Nothing to carry or upfront cost incurred. Bracketing is done via camera settings.
DISADVANTAGES OF BRACKETING
Post Processing required. More processing time and skill will be required.
Motion artefacts. Moving subjects or changing lighting conditions between bracketed shots can cause ghosting or misalignment issues.
Storage. Takes up more space on memory cards and computer due to shooting multiple exposures of each scene.
The choice between the bracketing and using filters will depend on the specific requirements of the scene, the preference and experience of the photographers workflow and the equipment to hand. I use both methods on a case by case basis. Generally I lean towards using grads when suitable. I use the Kase Armour system.
Summary
In summary, mastering the exposure triangle empowers photographers with technical and creative control, adaptability, and efficiency, leading to higher quality and more expressive photography.
- Creative control
- Optimal exposure
- Adaptability in various lighting conditions
- Minimise noise and maximise quality
- Improve efficiency
- Technical proficiency
- Better post-processing results
- Enhanced artistic expression
- Versatility across genres
- Confidence and consistency
I would encourage you to experiment with ISO, shutter speed and aperture and really get a feel for the different characteristics and think about how they might transform your creativity and improve your successes. Once the balance of the exposure triangle becomes second nature, you'll be able to shoot with less frustration and react to changing weather and light much more easily and enjoy the creativity more and more.
Download this guide as a printable PDF.
Download my exposure triangle as a printable PDF.