Managing Colour between Lightroom and Photoshop
If, like me, you use Lightroom and Photoshop in your editing workflow, it's essential to configure your external editor settings correctly in both applications. This ensures consistent colour handling when files are transferred between Lightroom and Photoshop, which is crucial for maintaining colour accuracy. Additionally, resolution is determined when the file is initially sent from Lightroom to Photoshop, so it's important to set this up correctly beforehand.
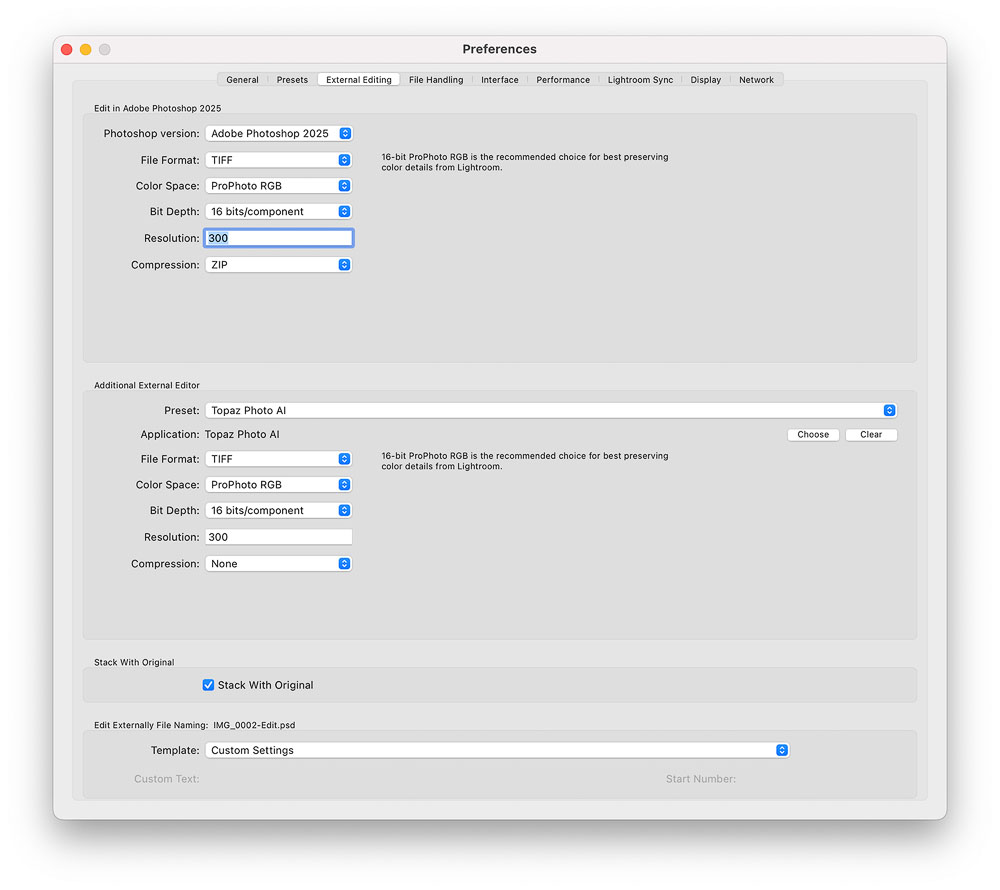
Open Lightroom>Preferences and select the external editing tab.

- Photoshop Version: You can see I have set Photoshop 2025 as my editor, this is the one which opens when I choose Photo>Edit In from the develop module in Lightroom.
- File format: TIFF
- Colour Space: ProPhoto RGB
- Bit Depth: 16bits/component (this is reccomended with ProPhoto to preserve colour details. 8 bit files are unable to accommodate enough colour data and can cause banding, for example)
- Resolution: 300 (PPI/DPI) This is important to set as the default is 240, but if you intend to send your files for printing 300 is better. In Lightroom there is no resolution baked in, as it is still working with RAW data until it is passed to an external editor.
You can set up other external editors the same way in the section underneath. I have set up Topaz Photo AI in my screenshot.
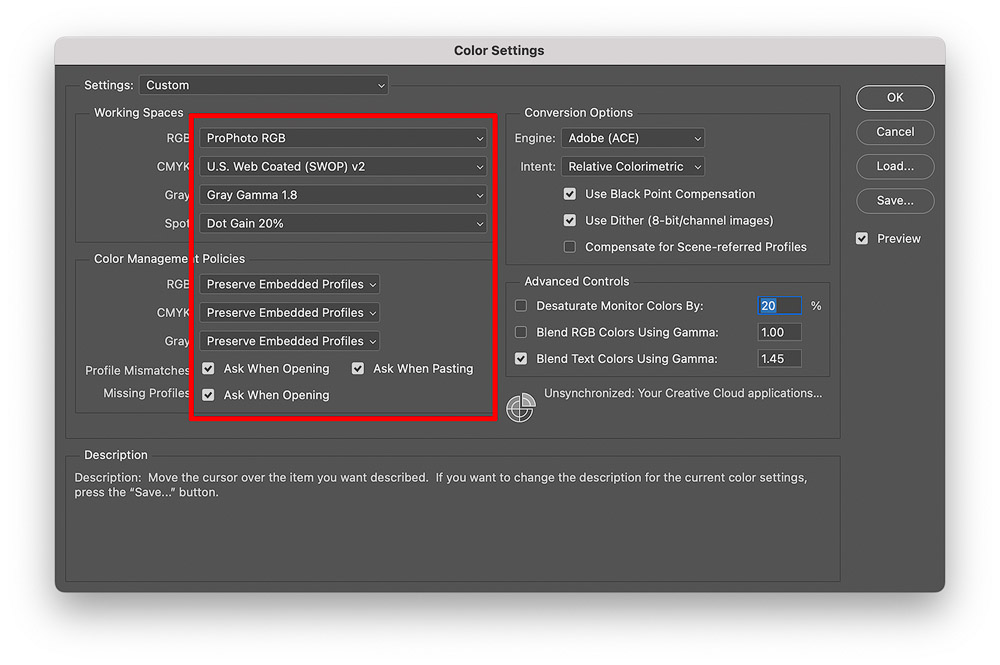
Next, you need to set up the Photoshop preferences to make sure it doesn't change anything when it recieves the file from Lightroom. In Photoshop click edit>colour settings to open the window below.

- Working Space: ProPhoto
- Gray: Gray Gamma 1.8 is the correct setting when working in ProPhoto RGB
Colour Management Policies
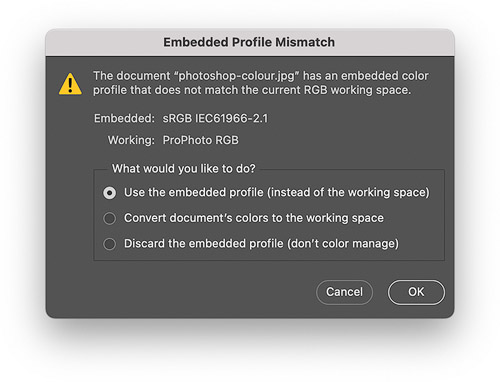
These options dictate how Photoshop deals with files as it opens them which are not in the working spaces defined in the top section. The checkboxes for missing and mismatched profiles are worth checking. With them checked, whenever you open a file in photoshop, it will pop up a dialogue box prompting you to decide how to proceed.

In this instance, I have opened a file which was optimised for web and has sRGB embedded, so I can just use the embedded profile (instead of my worksing space which is ProPhoto RGB).
It is unlikley you will see this prompt going from Lightroom to Photoshop once you have the options configured correctly as outlined here. The only scenario might be if you had previously set your external editor to use Adobe RGB from Lightroom, created a TIFF and then chosen to edit the saved file again in Photoshop. You could either contnue on Adobe RGB or convert ot to ProPhotoRGB.
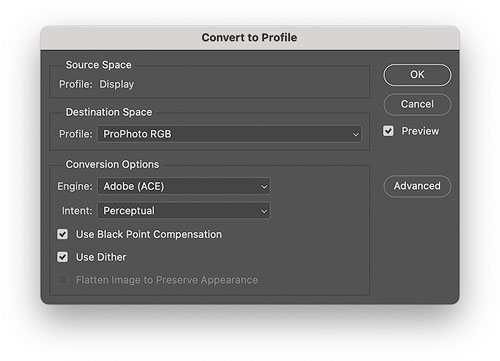
You can use the embedded profile and then convert it to a different working space in Photoshop via Photoshop>edit>covert to profile, which allows you to preview whether any colour shifting occurs should you want more control.

Colour Space Information and Rationale
Color space is a system that organises colours to ensure they can be accurately reproduced both digitally and physically. It defines how colours are represented using numerical values, allowing for consistent colour communication and reproduction across devices like cameras, monitors, and printers. For the purposes of photography and printing, I’m primarily concerned with RGB (Red, Green, Blue), which is an additive colour model where colours are created by combining red, green, and blue light in various intensities. Common RGB colour spaces include sRGB, Adobe RGB, ProPhoto RGB, and P3.
- sRGB: The smallest colour space, widely used and the standard for web browsers and many consumer devices. It ensures consistent colour reproduction across the internet. The best choice for email and internet.
- Adobe RGB: A larger colour space designed to provide a wider gamut for better colour rendition, particularly in print.
- P3 (DCI-P3): A colour space commonly used in digital cinema and projectors. It offers a wider gamut than sRGB, making it ideal for film and television production. It’s also used by Apple on their latest displays so can be a good choice if you know your files will be used on Apple devices. It’s a similar size to Adobe RGB, but it’s shifted slightly towards reds/oranges and loses some of the greens/blues.
- ProPhoto RGB: The largest colour space available in Lightroom and the best choice when transferring your images into Photoshop (or other colour managed editing software). It doesn’t work very well with 8bit files however, as it’s too much data to fit into a small bit depth and can cause banding in your images. Make sure you save files in 16bit format when using ProPhoto RGB.
With this in mind I use ProPhotoRGB as my working colour space. This retains as much colour gamut when switching between Lightroom and Photoshop.