Screen Calibration
Most modern computer screens offer good colour neutrality straight out of the box. However, calibration is essential to ensure accuracy, and it’s just as important to control your screen’s brightness, one of the biggest reasons prints turn out too dark is having a screen that’s too bright.
If you’re using an Apple XDR display (such as the Mac Studio Display or MacBook Pro), you can skip to the bottom of this page, as these displays are factory-calibrated and require only minor adjustments in System Preferences rather than full calibration with a measurement device.
A computer screen emits light (transmitted light), while a print relies on reflected light, which is why screen brightness can be misleading when preparing images for print.
Recommended Calibration Settings for Accurate Prints
To ensure your prints closely match what you see on screen, it’s widely accepted that the following calibration parameters provide the best results. These settings help align the transmitted light of your monitor with the reflected light of a print:
- Brightness: 80 cd/m² – This helps prevent prints from appearing too dark due to an overly bright screen.
- Gamma: 2.2 – This is the standard tone curve for most systems, ensuring smooth gradations and accurate contrast.
- White Point: D65 (6500K) – This represents a daylight-balanced white, which is ideal for most photographic editing and printing workflows.
Using these settings in combination with regular calibration will help maintain colour accuracy and consistency across your workflow. However, it’s also important to evaluate prints under proper lighting conditions, as ambient light can significantly affect how colours and tones appear.
There are many combinations of screens, operating systems, and calibration devices, but the process is broadly the same:
- A measurement device (e.g., a Spyder or X-Rite device) is placed on the screen.
- The software displays a series of “known colour” patches for the device to measure.
- A display profile is created and loaded with your operating system to adjust colours to a neutral, accurate state.
- The software also measures and provides guidance on screen brightness.
Wide Gamut vs Standard Displays: Hard vs Soft Calibration
Not all monitors are created equal when it comes to colour accuracy.
Standard and budget monitors typically cover sRGB and rely on soft calibration, where an ICC profile is applied within the operating system. This corrects colour but doesn’t alter the screen’s internal settings, meaning colour shifts may still occur over time. You will rely on the software which comes with your measurement device and need to use the button on the screen to adjust the brightness. Some screens have large increments between brightness levels, making it difficult to set an exact value like 80 cd/m², forcing you to choose between a setting that is slightly too bright or too dark.
Wide Gamut Monitors (such as those covering AdobeRGB or DCI-P3) often support hardware calibration, where the calibration settings are stored directly in the monitor’s internal hardware. This ensures greater accuracy and consistency, independent of software or operating system changes. To fully utilise these screens, you would use the manufacturer’s calibration software (such as Dell’s “Calibration Assistant” or Eizo’s “ColorNavigator”) in conjunction with a measurement device. This approach allows precise adjustments to colour, contrast, and brightness, ensuring a more stable and reliable workflow for print preparation.
For photographers and printmakers, a hardware-calibrated wide gamut display is ideal, as it provides a more reliable preview of colours before printing.
Apple XDR Displays
The latest generation of Apple Displays found in Mac Studio Displays and Mac Book Pro’s are so well calibrated in the factory that they do not require calibrating with a measurement device. However they do require customising from within the system preferences. The default photography preset is 160 cd/m² which is DOUBLE the brightness I suggest above. To create a preset set to 80 cd/m² follow these simple steps.
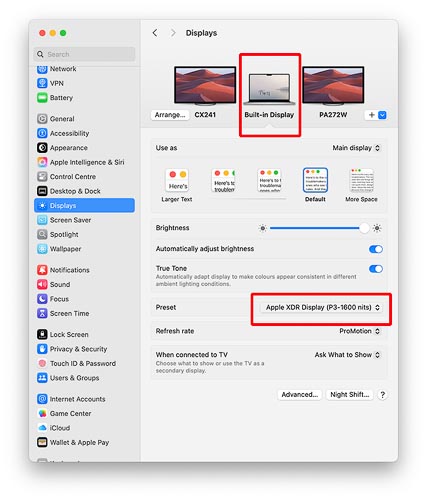
Open System Preferences > Displays - Select the Built-in Display. You'll see Apple XDR Display listed and the preset dropdown list if you have an XDR display. if this isn't listed, you likely have an older generation retina display, which will need to be calibrated with a device.
Click on the preset and choose customise presets to bring up the window below.
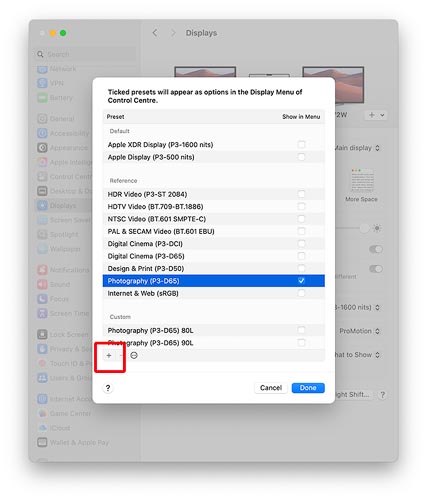
Select the built in photography preset as above and then click the plus icon.
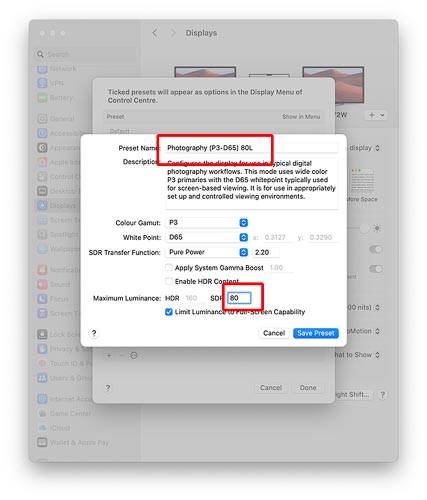
Adjust the name of the preset to identify it. I have used 80L to indicate a luminance of 80. Then set the number of the maximum luminance to 80 and save the preset
Note: Apple uses SDR brightness instead of cd/m² to indicate screen brightness. This is also commonly referred to as nits, but all three terms mean the same thing. For example, 80 cd/m² = 80 nits in Apple’s terminology.